Saturday, November 24, 2012
CHRISTMAS PENNY WREATH 2012

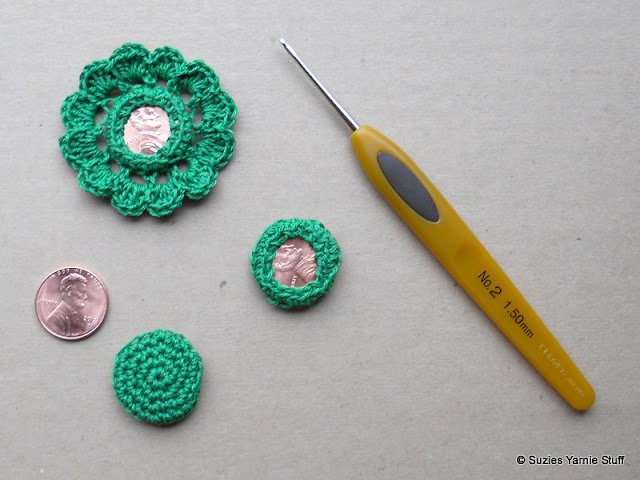
A shiny little penny to hang upon your tree
Encased inside a wreath with love to you from me.
Encased inside a wreath with love to you from me.
After Christmas hang your penny where you’ll see it every
day
A little reminder of the Christmas love I sent to you today.
MATERIALS:
Size 10 crochet thread small amount
Size 10 crochet thread small amount
12 inches of yarn for bow
US Size 8 (1.50 mm) steel
crochet hook
Needle with eye large enough to accept the crochet thread
Needle with eye large enough to accept the crochet thread
Penny
Stiffener (optional)
Foam brush to apply
stiffener (optional)
6 inches of gold cord or
narrow ribbon for hanger (optional)

NOTES:
1. Read instructions through before beginning.
2. I used a Clover hook, they have a different numbering system. Their size 2 is 1.50 mm, which is equal to a US 8 steel hook.
2. I used a Clover hook, they have a different numbering system. Their size 2 is 1.50 mm, which is equal to a US 8 steel hook.
3. I used Knit-Cro-Sheen for the wreath and Red Heart Shimmer for the yarn ribbon. Take the yarn off the outside of the ball, so it will be nice and straight, no kinks like pulling from the inside of a new ball.
4. Don’t be disappointed if you can’t see the date on your penny, I was bummed. However to hold the penny in place, the date is partially covered. You can peek at it though.
5. I used white Elmer’s Glue diluted half strength and only put it on the last round of the wreath. I didn’t pin the wreath, just pulled it into shape. Then pounced the glue on with one of the cheap foam brushes from Michaels.
2 inches (okay slightly less than 2 inches) in diameter
BASE:
Chain 2.
Chain 2.
Round 1: Working over beginning tail, 6 sc in 2nd ch
from hook. Do not join, use a marker to keep
track of continuous rounds. (6 sts)
Round 2: 2 sc in each sc around. Move up your marker. (12 sts)
Round 3: *Sc in 1 st, 2 sc in next st. Repeat from * around. Move up your marker. (18 sts)
Round 4: *Sc in 2 sts, 2 sc in next st. Repeat from * around. Slip stitch in next st. Move up your marker. (24 sts)
Round 5: Sc in the back loop of each sc around. Slip stitch in next st.
Fasten off leaving at least a
6 to 8 inch tail.
Weave the tail in and out of
back loop of round 5. Place penny tails
down on wrong side of base. Put the join
at the bottom of the penny then the bow will cover any unevenness. Pull tightly over penny.
Weave in end.
Wreath:
Wreath:
Round 1: Attach the thread with a sc in the unused loop
of the round 4 stitch under Honest Abe’s coat.
*Ch 3, skip 1 st, sc in next st.
Repeat from * around. End ch 1, hdc
in first sc. (12 loops)
Round 2: Ch 3, 2 dc in loop formed by ch 1 and hdc. *Slip stitch in sc, 5 dc in next loop. Repeat from * around. End with slip stitch in sc, 2 dc in first loop. Join with a slip stitch in top of ch 3. (12 dc groups)
Fasten off and weave in ends.
If you are going
to use stiffener place wreath face side down on foil or waxed paper and apply
stiffener.
Finishing:
When stiffener
(if used) is dry, cut a strand of contrasting yarn about 12 inches long. Starting at bottom of wreath weave through
the openings and tie into a bow.
Thread the gold
cord or ribbon through the top of the wreath and tie an overhand knot close to
the ends for hanger.
Tuesday, November 20, 2012
STASH SLASHER STOCKING GARLAND (countdown)

MATERIALS:
Worsted weight
yarn about ½ ounce per stocking
US size I (5.5 mm)
crochet hook
Marker (I use a
bobby pin)
Tapestry needle
Ribbon for hanging
about 10 inches for each stocking
Purchased holly
garland for hanging stockings
Card stock for
numbers (optional)
NOTES:
1. Read
instructions through before beginning.
2. These
stockings are nearly the same as my stocking ornaments, but crocheted in
continuous rounds.
3. I used
the garland that has chained links.
4. Instead
of buying holly garland you can crochet a strip as I did in my other garland
patterns. But since you saved money by
using stash yarn splurge on the garland.
5. A tug
on the heel will give the stocking a better shape.
6. If you
are going to use the garland as a Christmas Countdown you may like to print out
the numbers 1-24 on card stock.
INSTRUCTIONS:
TOE:
Round 1: Ch 2, 6 sc in 2nd ch
from hook. DO NOT join, place marker. (6 sc)
Work rounds 2-9 in
continuous rounds.
Round 2: *Sc in 1 st, 2 sc in next st,
repeat from * around. Move up marker. (9 sc)
Round 3: *Sc in 2 st, 2 sc in next st, repeat
from * around. Move up marker. (12 sc)
Round 4: *Sc in 3 sc, 2 sc in next st,
repeat from * around. Move up
marker. (15 sc)
Round 5-9: Sc in each st
around. Move up marker. (15 sc)
HEEL: (worked
in rows)
Row 1 (right side): Sc in 1 st, hdc
in next st, sc in next st, slipstitch in next st, ch 1 turn.
Row 2: Sc
in 2 sts, hdc in next st, sc in next 2 sts, slipstitch in next st, ch 1 turn.
Row 3: Sc in 2 sts, hdc in 3 sts (when
working in hdc of previous row go into the front 2 loops of st), sc in 2 sts, slipstitch
in next st, ch 1 turn.
Row 4:
Sc in 3 sts, hdc in 3 sts, sc in 3 sts, slipstitch in next st, ch 1 turn.
Row 5: Sc in 3 sts, hdc in 5 sts (when
working in hdc of previous row go into the front 2 loops of st), sc in 3 sts, slipstitch
in next st, ch 1 turn.
Row 6: Sc
in 4 sts, hdc in 5 sts, sc in 4 sts, slipstitch in next st, ch 1 turn.
Row 7: Sc in 15 st, (when working in
hdc of previous row go into the front 2 loops of st). Place marker. Do not join. (15 sts)
LEG:
Work rounds 10-15
in continuous rounds.
Rounds 10-14: Sc in each st. Move up marker. (15 sc)
Rounds 15: Sc in each
st. Slip stitch in next st.
Fasten off and
weave in end.
Thursday, November 15, 2012
GO BLUE HEADBAND (EAR WARMER)

Today’s post is
a pattern by guest designer Cheri from Ohio.
MATERIALS:
Small amount of
Red Heart Super Saver (4) yarn in your choice of color(s)
US size I (5.5
mm) crochet hook
STITCHES USED:
ch - chain
ss - slip stitch
dc - double
crochet
Front
Post Double Crochet (fpdc): yo (yarn over) your hook; starting from the front, place hook
from front to back to front (as per arrow in example) around the post of
st (stitch) in row below; complete as a dc (double crochet).

Back
Post Double Crochet (bpdc): yo, starting from the back, place hook from back to front to
back (as per arrow in example) around post of st in row below; complete as
a dc.

NOTES:
This is pretty
"stretchy". If you want a smaller headband, decrease original chain
loop in multiples of 2 stitches.
If you want a
bigger headband, add chains in multiple of 2 stitches.
Total number of
rounds also depends on how wide you want your headband. You can make it one solid
color, or stripes. 7 or 8 rounds.
INSTRUCTIONS:
7 ROUNDS
Color A - 2 rounds
Color B - 3 rounds
Color A - 2
rounds.
8 ROUNDS
Color A - 3 rounds
Color B - 2 rounds
Color A - 3 rounds
Color A:
Ch 70 Making
sure you do NOT twist the chain, join with a ss to form a loop.
ROUND 1: Ch 3 (Do NOT 'turn' work in rounds) dc
in next ch and in each ch around. Ss in top of ch 3 to join. (69 dc)
ROUND 2: Ch 3 fpdc around first dc, *bpdc around
next dc, fpdc around next dc. Work from
* around. Ss in top of ch 3 to join.
(If you are
making this in the 7 round color combination, change to color B on last fpdc: yo,
insert hook front to back to front around post, yo, draw up a loop, 3 loops on
hook, yo, pull through 2 loops, change to color B, yo through last 2 loops)
Repeat Round 2,
changing colors when completing the number of rounds for your pattern.
After last round and last ss, cut yarn, pull tight and weave in the ends.
That's it.
Monday, November 12, 2012
TOP DOWN SEAMLESS JERKIN LARGE

1/25/2013 Edited row 19 to make a neater increase.
Jer·kin
[jur-kin]
–noun
a close-fitting jacket or short coat, usually sleeveless
This close
fitting garment is super stretchy, worked in rib and broken rib stitches.
MATERIALS:
About 5-6 ounces
of worsted weight (4) yarn
24 inch circular
knitting needle see notes for information on sizes
US F (4.0mm)
crochet hook
Marker
Tapestry needle
5/8 -3/4 inch
button
SIZE:
Measured flat in inches
Red Heart Super Saver:
13.5 long X 11.0 wide (stretches to 15)
Caron One Pound:
14.75 long X 12.5 wide (stretches to 16)
ABBREVIATIONS:
K = Knit
P = Purl
PM – Place
marker
PU = pick up and
knit
YO = yarn over
K2tog = Knit two
stitches together
Kfb = Increase
by knitting in front and back of the same stitch
K1 tbl = Knit 1
through the back loop
SPECIAL STITCHES:
K1 tbl = knit 1
through the back loop. Here’s a video:
GAUGE:
21 yoke rows = about 3.5 inches
NOTES:
- Read instructions all the way through before
beginning.
- Garment is knit from the top down with opening
in the back, or the front if that is your pleasure.
- Red Heart Super Saver was knit on size US 8 (5.0
mm) needle.
- Caron One Pound was knit on US size 9 (5.5 mm)
needle.
INSTRUCTIONS:
Cast on 69 sts, leaving about an 10 inch tail. More about the tail later.
Cast on 69 sts, leaving about an 10 inch tail. More about the tail later.
Row 1 (right side): *K1,
P1. Repeat from *across. K1. (69
sts)
Row 2: *P1, K1. Repeat from
* across. P1. (69 sts)
Rows 3-6:
Repeat rows 1 and 2. (69 sts)
Row 7: *K1, YO. Repeat from * across. K1. (137 sts)
Row 8: *P1, K1 tbl. Repeat from
* across. P1. (137 sts)
Row 9: *K1, P1. Repeat from * across. K1. (137
sts)
Row 10: *P1, K1. Repeat from
* across. (137 sts)
Rows 11-18: Repeat
rows 9 and 10. (137 sts)
Row 19: K1, Kfb once, P1. *K2, P2.
Repeat from * across. K2. (138 sts)
Row 20: *P2, K2. Repeat from * across. P2.
(138 sts)
Row 21: K. (138 sts)
DO NOT TURN
Place marker.
Switch to
working in the round. We will keep the
same numbering sequence.
Round 22:
P. (138 sts)
Round 23: K2tog,
P2. *K2, P2. Repeat from * across. K2tog. (136 sts)
Round 24: K1,
P2. *K2, P2. Repeat from * across. K1.
(136 sts)
Round 25: K.
(136 sts)
Round 26:
P. (136 sts)
Round 27: K1,
*P2, K2. 4 times, P2. Bind off 28 sts, *K2 (the st on the right
needle counts as the first K), P2. 10 times. K2. Bind
off 28 sts. *P2 (the st on the right
needle counts as the first P), K2. 4 times.
P2, K1. (80 sts)
Picking up one stitch in the first bound
off sleeve stitch makes a smoother transition.
Round 28: K1,
*P2, K2. 4 times, P2. PU 1 st (pick up and knit) in the first bound
off st, cast on 9 sts, *K2, P2. 10 times. K2. PU
1 st (pick up and knit) in the first bound off st, cast on 9 sts. *P2, K2 4 times. P2, K1.
(100 sts)
Round 29:
K18, K2tog, K8, K2tog, K40, K2tog, K8, K2tog, K18. (96 sts)
Round 30: P. (96 sts)
Round 31-32:
K1, *P2, K2. Repeat from * around. P2, K1. (96 sts)
Round 33:
K. (96 sts)
Round 34:
P. (96 sts)
Repeat rounds 31-34
until jerkin is about 1 1/2 inch shorter than you desire. I knit mine with 11 pattern repeats at the
underarm.
Next 8 rounds:
K1, *P2, K2. Repeat from * around.
K1. (96 sts)
Bind off in rib.
Fasten off and
weave in end.
BUTTON
LOOP:
With your crochet hook, put hook through
cast on row and pull up a loop using the beginning tail. Chain 6.
Test to be sure your button will fit through loop. Fasten off and weave end into row 1 or 2.
Sew on button.
TOP DOWN SEAMLESS JERKIN MEDIUM

1/25/2013 Row 19 edited to a make a neater increase.
Jer·kin
[jur-kin]
–noun
a close-fitting jacket or short coat, usually sleeveless
This close
fitting garment is super stretchy, worked in rib and broken rib stitches. .
MATERIALS:
About 4-5 ounces
of worsted weight (4) yarn
16 to 24 inch
circular knitting needle see notes for information on sizes
US F (4.0mm)
crochet hook
Marker
Tapestry needle
5/8 -3/4 inch
button
SIZE:
Measured flat in inches
Red Heart Super Saver:
12.75 long X 9.5 wide (stretches to 13)
Caron One Pound:
13.25 long X 10.5 wide (stretches to 14)
ABBREVIATIONS:
K = Knit
P = Purl
PM – Place
marker
PU = pick up and
knit
YO = yarn over
K2tog = Knit two
stitches together
Kfb = Increase
by knitting in front and back of the same stitch
K1 tbl = Knit 1
through the back loop
SPECIAL STITCHES:
K1 tbl = knit 1
through the back loop. Here’s a video:
GAUGE:
NOTES:
- Read instructions all the way through before
beginning.
- Garment is knit from the top down with opening
in the back, or the front if that is your pleasure.
- Red Heart Super Saver was knit on size US 8 (5.0
mm) needle.
- Caron One Pound was knit on US size 9 (5.5 mm)
needle.
INSTRUCTIONS:
Cast on 63 sts, leaving about an 10 inch tail. More about the tail later.
Cast on 63 sts, leaving about an 10 inch tail. More about the tail later.
Row 1 (right side): *K1,
P1. Repeat from *across. K1. (63
sts)
Row 2: *P1, K1. Repeat from
* across. P1. (63 sts)
Rows 3-4:
Repeat rows 1 and 2. (63 sts)
Row 5: *K1, YO. Repeat from * across. K1. (125 sts)
Row 6: *P1, K1 tbl. Repeat from
* across. P1. (125 sts)
Row 7: *K1, P1. Repeat from * across. K1. (125
sts)
Row 8: *P1, K1. Repeat from
* across. (125 sts)
Rows 9-18: Repeat
rows 7 and 8. (125 sts)
Row 19: K1, Kfb once, P1. *K2, P2.
Repeat from * across. K2. (126 sts)
Row 20: *P2, K2. Repeat from * across. P2.
(126 sts)
Row 21: K. (126 sts)
DO NOT TURN
Place marker.
Switch to
working in the round. We will keep the
same numbering sequence.
Round 22:
P. (126 sts)
Round 23: K2tog, *P2, K2. 4 times.
P2. Bind off 24 sts, *K2 (the st
on the right needle counts as the first K), P2.
9 times. K2. Bind off 24 sts. *P2 (the st on the right needle counts as the
first P), K2. 4 times. P2. K2tog. (76 sts)
Picking up one stitch in the first bound
off sleeve stitch makes a smoother transition.
Round 24:
K1, *P2, K2. 4 times. P2. PU 1 st (pick up and knit) in the first bound
of st, cast on 5 sts. *K2, P2. 9 times. K2. PU
1 st in the first bound of st, cast on 5 sts. *P2, K2. 4 times.
P2. K1. (88 sts)
Round 25:
K18, K2tog, K4, K2tog, K36, K2tog, K4, K2tog, K18. (84 sts)
Round 26: P. (84 sts)
Round 27-28:
K1, *P2, K2. Repeat from * around. P2, K1. (84 sts)
Round 29:
K. (84 sts)
Round 30:
P. (84 sts)
Repeat rounds 27-30
until jerkin is about 1.5 inch shorter than you desire. I knit mine with 10 pattern repeats at the
underarm.
Next 8 rounds:
K1, *P2, K2. Repeat from * around.
K1. (84 sts)
Bind off in rib.
Fasten off and
weave in end.
BUTTON
LOOP:
With your crochet hook, put hook through
cast on row and pull up a loop using the beginning tail. Chain 6.
Test to be sure your button will fit through loop. Fasten off and weave end into row 1 or 2.
Sew on button.
Sunday, November 04, 2012
WARM WAFFLES CAR SEAT BLANKET AND CAP
Special thanks to Virginia in WA for testing this pattern.
SIZE: 24 x 28 inches
MATERIALS:
Worsted (4) weight yarn approximately 8 ounces for blanket only
Worsted (4) weight yarn approximately 8 ounces for blanket only
US size 10 (6.0 mm) 24-29
inch circular knitting needle
Tapestry needle
Tapestry needle
NOTES:
1. Read instructions all
the way through before beginning.
2. Blanket is worked on a circular needle to accommodate
the large number of stitches. It is not worked in the round.
3. If you are using one of the lighter weight (4) yarns,
like Simply Soft or Pound of Love, you probably should go down a needle size
and cast on additional stitches.
4. If you want a wider blanket cast on additional
stitches in increments of six.
5. Blanket in photo knit with Caron One Pound.
GAUGE: 13 sts = 4 inches
(not really important)
INSTRUCTIONS:
With circular needle, cast on 81 sts.
With circular needle, cast on 81 sts.
BORDER:
Knit 5 rows. (81
sts)
WAFFLE PATTERN:
Row 1: K. (81 sts)
Row 2: K5, P across to last 5 sts, K5. (81 sts)
Row 3: K5, *P2, K1.
Repeat from * to last 7 sts, P2, K5. (81 sts)
Row 4: K5, *K2, P1.
Repeat from * to last 7 sts, K7. (81 sts)
Repeat
rows 1-4 until blanket is about 12 inches from cast on edge. End with row 4.
Next
row creates the seat belt slot.
Next row: K35, bind off 11 sts, K35. (70 sts)
Next row: K5, P30, PU 1 st (pick up and purl) in the
first bound off st, cast on 11 sts, PU 1
st (pick up and purl) in the last bound off st,
P30, K5. (83 sts)
Working in pattern, work “row 3” as follows. K5, *P2, K1. Repeat from * 9 times. P2tog, P1, K1. *P2, K1.
Repeat from @ once. P1, P2tog,
K1. *P2, K1. Repeat from * 8 times. End with P2, K5 (81 sts)
Starting
with row 4, repeat rows 1-4 until blanket is about 19 inches from cast on edge. End with row 4.
Next
row creates the shoulder strap slot.
Next row: K33, bind off 15 sts, K33. (66 sts)
Next row: K5, P28, PU 1 st (pick up and purl) in the first
bound off st, cast on 15 sts, PU 1 st
(pick up and purl) in the last bound off st,
P28, K5. (83 sts)
Working in pattern, work “row 3” as follows. K5, *P2, K1. Repeat from * 8 times. P1, P2tog, K1. *P2, K1.
Repeat from * 3 times. P2tog, P1,
K1. *P2, K1. Repeat from * 7 times. End with P2, K5 (81 sts)
Starting
with row 4, repeat rows 1-4 until blanket is about 27 inches from cast on edge.
End with row 2.
BORDER:
Knit 5 rows. (81
sts)
Bind off.
Weave in ends.
Optional:
Work a buttonhole stitch around both openings as reinforcement.
CAP:
SIZE: 11-14 inches
MATERIALS:
Worsted weight (4) yarn 1.5 ounce for cap only
Worsted weight (4) yarn 1.5 ounce for cap only
US size 10 (6 mm) 16 inch
circular knitting needle
US size 10 (6 mm) double pointed needles
Tapestry needle
Marker
US size 10 (6 mm) double pointed needles
Tapestry needle
Marker
NOTES:
Change
to double point needles when necessary.
INSTRUCTIONS:
With 16 inch needle, cast on 48 sts. Join and work in the round.
With 16 inch needle, cast on 48 sts. Join and work in the round.
Place marker to denote
beginning of round.
Work K2, P2 ribbing for 2 ½
inches. (48 sts)
Rounds 1-2:
Knit.
Rounds 3-4: *P2,
K1. Repeat from * around.
Repeat rounds 1-4 until cap measures about 6 inches from cast on edge
ending with round 4.
Next round: *K6, K2tog. Repeat from * around. (42 sts)
Next round: *K5, K2tog.
Repeat from * around. (36 sts)
Next round: *K4, K2tog.
Repeat from * around. (30 sts)
Next round: *K3, K2tog.
Repeat from * around. (24 sts)
Next round: *K2, K2tog. Repeat from *
around. (18 sts)
Next round: *K1, K2tog. Repeat from *
around. (12 sts)
Next round: *K2tog.
Repeat from * around. (6 sts)
Finish in one of these two ways:
1. Cut yarn and use tapestry needle to run yarn
tail through the stitches and pull to close.
Before you weave in the end decide which side you like best. The cap in the photo is wrong side out.
Weave in ends.
2. Optional I Cord Knot, start I Cord, k2tog, k2, k2tog
for the first row only.
Knit 5 or 6 inch I Cord with
the remaining 5 stitches.
Cut yarn leaving a 6 inch
tail.
Use tapestry needle to run
yarn tail through the stitches and pull to close. Now run yarn down the center of the I Cord.
Tie I Cord in a knot.
Weave in ends.
![]()
